
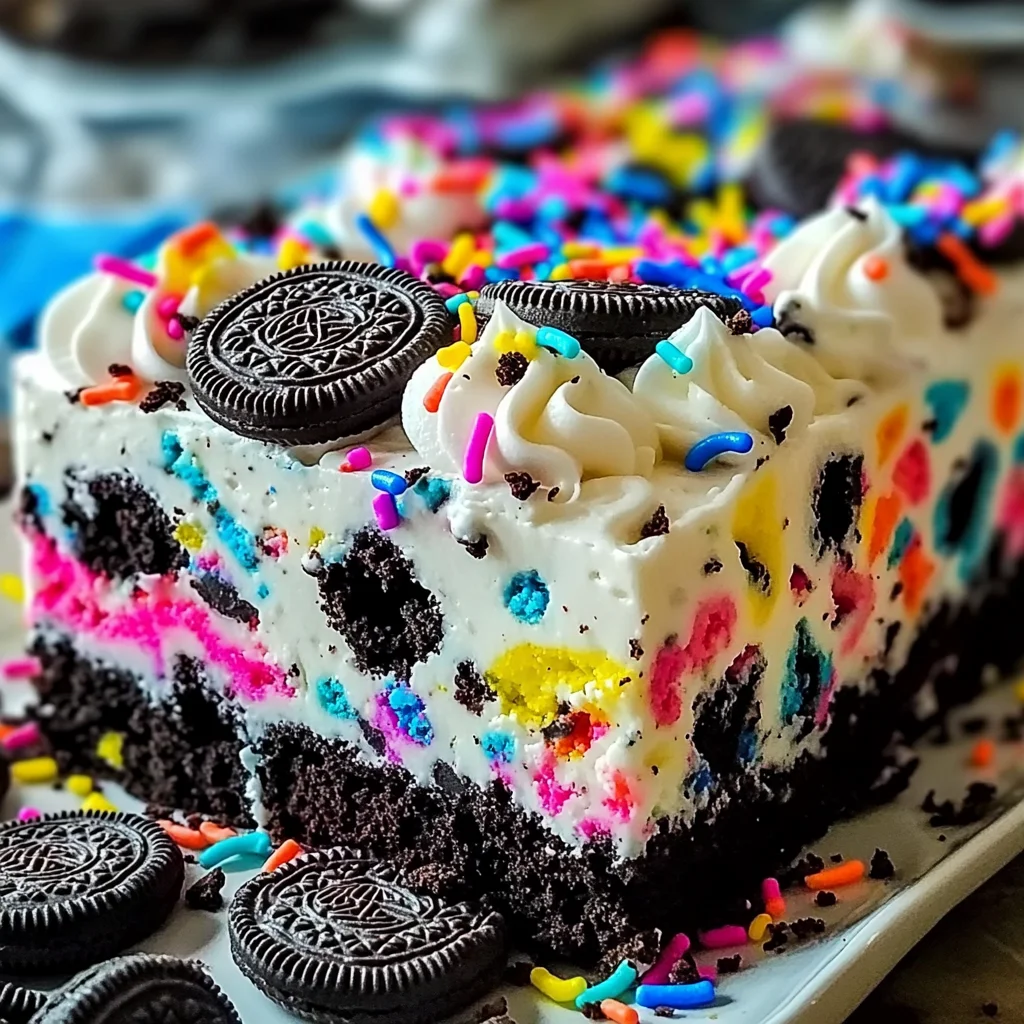
Treat yourself to a delightful No-Bake Funfetti Oreo Icebox Cake! This fun and colorful dessert is easy to make and perfect for celebrations. Whether you’re hosting a birthday party or simply want to indulge in a sweet treat, this cake is sure to impress. Its creamy layers, crunchy cookies, and vibrant sprinkles make it stand out at any gathering.
Why You’ll Love This Recipe
- Effortless Preparation: No baking required! Simply mix, layer, and chill for an easy dessert.
- Colorful Presentation: The vibrant sprinkles add a fun touch, making it perfect for kids’ parties or festive occasions.
- Creamy Texture: The combination of whipped cream and cream cheese creates a luscious filling that melts in your mouth.
- Versatile Flavor: Customize with different flavors of cake mix or cookies to suit your taste.
- Make Ahead Option: Prepare it the night before and let it chill, saving you time on the day of your event.
Tools and Preparation
To create this No-Bake Funfetti Oreo Icebox Cake, you will need some essential tools. Having the right equipment makes the process smoother and more enjoyable.
Essential Tools and Equipment
- Mixing bowls
- Hand mixer or stand mixer
- Spatula
- 9×13 inch dish
- Measuring cups
Importance of Each Tool
- Mixing bowls: These are crucial for combining ingredients without making a mess.
- Hand mixer or stand mixer: Ensures that your cream reaches stiff peaks quickly and efficiently.
- Spatula: Perfect for folding ingredients together without deflating the whipped cream.

Ingredients
For the Cream Mixture
- 2 cups heavy cream
- 1/4 cup powdered sugar
- 1 teaspoon vanilla extract
- 1 package (8 oz) cream cheese, softened
- 1/2 cup Funfetti cake mix
- 1/4 cup milk
For the Layers
- 1 package (14.3 oz) Oreo cookies
- 1/4 cup sprinkles
How to Make No-Bake Funfetti Oreo Icebox Cake
Step 1: Prepare the Whipped Cream
In a large bowl, whip the heavy cream, powdered sugar, and vanilla extract until stiff peaks form. Set aside.
Step 2: Mix the Cream Cheese Filling
In another bowl, beat the cream cheese until smooth. Add the Funfetti cake mix and milk, mixing until fully combined.
Step 3: Combine Mixtures
Gently fold the whipped cream into the cream cheese mixture until well incorporated.
Step 4: Layer It Up
In a 9×13 inch dish, spread a thin layer of the cream mixture on the bottom.
Step 5: Add Oreo Cookies
Arrange a layer of Oreo cookies over the cream mixture. Spread another layer of the cream mixture over the cookies.
Step 6: Repeat Layers
Repeat layering with more cookies and cream mixture until all ingredients are used, ending with the cream mixture on top.
Step 7: Top with Sprinkles
Sprinkle colorful sprinkles on top for added fun!
Step 8: Chill
Cover and refrigerate for at least 4 hours, or overnight, to allow cookies to soften and flavors to meld together.
Prep Time: 20 minutes
Cook Time: 20 minutes
Total Time: 40 minutes
Enjoy this No-Bake Funfetti Oreo Icebox Cake at your next celebration!
How to Serve No-Bake Funfetti Oreo Icebox Cake
Serving your No-Bake Funfetti Oreo Icebox Cake can elevate your dessert experience. Here are some fun and creative ways to present this colorful treat.
Individual Portions
- Use small cups or jars to serve individual portions of the cake. This makes it easy for guests to grab a serving without cutting into a larger cake.
Garnish with Fresh Fruits
- Top each slice with fresh berries like strawberries or raspberries. The tartness of the fruit complements the sweetness of the cake perfectly.
Add Whipped Cream
- A dollop of whipped cream on top adds an extra layer of creaminess that enhances the overall flavor of the cake.
Serve with Ice Cream
- Pair slices with a scoop of vanilla, chocolate, or even fruity sorbet. The combination will delight anyone with a sweet tooth.
Create a Dessert Platter
- Arrange slices of the No-Bake Funfetti Oreo Icebox Cake on a platter along with other desserts. This allows for a variety of flavors and textures for guests to enjoy.
How to Perfect No-Bake Funfetti Oreo Icebox Cake
Making your No-Bake Funfetti Oreo Icebox Cake as delicious as possible is key. Here are some tips to ensure it’s perfect every time.
- Chill thoroughly: Allow the cake to chill in the refrigerator for at least 4 hours, ideally overnight, to let the flavors meld and cookies soften.
- Use high-quality cream cheese: For a smoother texture and richer flavor, opt for full-fat cream cheese.
- Choose fresh ingredients: Always use fresh whipped cream and new packets of cookies for the best taste.
- Experiment with sprinkles: Use different types of sprinkles or edible glitter to make your cake visually stunning.
- Layer carefully: Ensure each layer is even; this helps maintain structure when serving.
Best Side Dishes for No-Bake Funfetti Oreo Icebox Cake
Complementing your No-Bake Funfetti Oreo Icebox Cake with delightful side dishes can create a well-rounded dessert table. Here are some great options:
-
Fruit Salad
A refreshing mix of seasonal fruits can balance out the sweetness of the cake and add brightness to your plate. -
Chocolate Mousse
Light and airy chocolate mousse provides a rich contrast to the lighter texture of the icebox cake. -
Mini Cheesecakes
Offer mini cheesecakes in various flavors as bite-sized treats that pair nicely with the main dessert. -
Panna Cotta
This creamy Italian dessert can be flavored in various ways, such as vanilla or berry, complementing your icebox cake beautifully. -
Cookies Platter
Include an assortment of cookies for guests who may want additional sweet bites alongside their main dessert. -
Yogurt Parfaits
Layer yogurt with granola and fruits for a healthier option that still satisfies sweet cravings while offering contrasting textures.
Common Mistakes to Avoid
When making a No-Bake Funfetti Oreo Icebox Cake, it’s easy to overlook some details. Here are common mistakes to avoid for the best results.
- Not Whipping Cream Enough: Ensure the heavy cream reaches stiff peaks. Under-whipped cream will not hold its shape, affecting the cake’s structure.
- Skipping Refrigeration Time: Always refrigerate the cake for at least 4 hours. This allows the cookies to soften and flavors to blend, enhancing taste and texture.
- Using Expired Ingredients: Check dates on your cream cheese and whipped cream. Fresh ingredients lead to a better-tasting dessert.
- Overmixing the Cream Mixture: When combining whipped cream with cream cheese, fold gently. Overmixing can deflate the whipped cream, resulting in a denser cake.
- Neglecting Layering Technique: Make sure to layer cookies and cream evenly. This ensures every slice contains a perfect balance of flavors and textures.
Storage & Reheating Instructions
Refrigerator Storage
- Store in an airtight container for up to 5 days.
- Keep covered with plastic wrap or foil to maintain freshness.
Freezing No-Bake Funfetti Oreo Icebox Cake
- Freeze for up to 2 months in a tightly sealed container.
- Allow it to thaw in the refrigerator overnight before serving.
Reheating No-Bake Funfetti Oreo Icebox Cake
- Oven: Not recommended as this dessert is best served chilled.
- Microwave: Use sparingly; heat in short bursts (10-15 seconds) if needed.
- Stovetop: Not applicable for this dessert type.
Frequently Asked Questions
Here are some common questions about making a No-Bake Funfetti Oreo Icebox Cake.
How long does the No-Bake Funfetti Oreo Icebox Cake last?
This cake can be stored in the refrigerator for up to 5 days when kept airtight.
Can I customize my No-Bake Funfetti Oreo Icebox Cake?
Absolutely! Feel free to use different flavors of cake mix or types of cookies for a unique twist.
What if I can’t find Funfetti cake mix?
You can make your own by mixing plain cake mix with colorful sprinkles!
Is it safe to eat raw cake mix in the No-Bake Funfetti Oreo Icebox Cake?
Yes, but make sure it’s heat-treated or labeled safe-to-eat raw, as traditional mixes may contain raw flour.
Final Thoughts
The No-Bake Funfetti Oreo Icebox Cake is a delightful treat that offers both flavor and fun. Its simplicity makes it perfect for various occasions, from parties to casual gatherings. Customize it with your favorite cookie or sprinkle variations for an even more personalized experience! Don’t miss out on trying this colorful dessert!

No-Bake Funfetti Oreo Icebox Cake
- Total Time: 0 hours
- Yield: Approximately 12 servings 1x
Description
Indulge in a colorful and delightful treat with this No-Bake Funfetti Oreo Icebox Cake! This easy-to-make dessert features creamy layers, crunchy cookies, and vibrant sprinkles, making it the perfect centerpiece for celebrations or a simple sweet indulgence. With no baking required, you can whip it up in just 40 minutes and let it chill for hours to meld the flavors together. This cake is sure to impress kids and adults alike, providing a fun twist on traditional desserts.
Ingredients
- 2 cups heavy cream
- 1/4 cup powdered sugar
- 1 teaspoon vanilla extract
- 8 oz cream cheese, softened
- 1/2 cup Funfetti cake mix
- 1/4 cup milk
- 14.3 oz Oreo cookies
- 1/4 cup sprinkles
Instructions
- In a large bowl, whip the heavy cream, powdered sugar, and vanilla extract until stiff peaks form. Set aside.
- In another bowl, beat the cream cheese until smooth. Add the Funfetti cake mix and milk, mixing until fully combined.
- Gently fold the whipped cream into the cream cheese mixture until well incorporated.
- In a 9×13 inch dish, spread a thin layer of the cream mixture on the bottom.
- Arrange a layer of Oreo cookies over the cream mixture and spread another layer of the cream mixture over the cookies.
- Repeat layering with more cookies and cream mixture until all ingredients are used, finishing with the cream mixture on top.
- Sprinkle colorful sprinkles on top for added fun!
- Cover and refrigerate for at least 4 hours or overnight.
- Prep Time: 20 minutes
- Cook Time: N/A
- Category: Dessert
- Method: No-Bake
- Cuisine: American
Nutrition
- Serving Size: 1 slice (approximately 100g)
- Calories: 350
- Sugar: 24g
- Sodium: 150mg
- Fat: 27g
- Saturated Fat: 16g
- Unsaturated Fat: 10g
- Trans Fat: 0g
- Carbohydrates: 30g
- Fiber: 1g
- Protein: 3g
- Cholesterol: 70mg